About The Project:

The airplane is a home-built, scratch-built Zenith CH 750 STOL. Building from plans/blueprints is a challenging way to build an airplane, since most of the parts you use to build it are not prefabricated. I chose the Zenith CH 750 STOL for its rugged design, its STOL (Short Take-Off and Landing) characteristics and its aluminum construction. Zenith Aircraft Company has designed this airplane so that it can be built from scratch or from a kit by the average person. They provide excellent technical support for both kit and scratch builders. In addition, I'll be installing a 1965 Chevrolet Corvair 164 cid horizontally opposed, air cooled, 6-cylinder engine, with special conversion parts to make it suitable for airplane duty. This is what the airplane will look like when I'm done, although I'll have a different paint scheme:

Follow my progress below!

Wednesday, April 3, 2019

DIY Aviation Survival Vest

Friends,

The cold weather is finally coming to a close. I never could get a good heating solution going in the shop this winter, so not much progress was made on the Zenith for the past few months. In the interim, I've worked on a few more drafting videos and decided to put together a pilot survival vest. My mission for 2019 includes visiting some backcountry areas with the Cessna, so it just makes sense to have some kind of survival gear with me in the event of a forced landing or if I get stuck someplace. This kit fits well with my aviation goals in the future, especially when the Zenith is completed. Check out the video below for some show-and-tell on my DIY Aviation Survival Vest:


Cheers!

Sunday, March 10, 2019

Drafting Basics - Reading Zenith Blueprints Parts 1 & 2

Friends,

Spring is just around the corner, but we still have too-cold temps for me to be in the shop. My number one priority for next winter is a real furnace that keeps the shop warm-ish all the time. After a long cold soak, it takes hours and hours to bring the shop up to temp because all the machinery, materials and other mass just sucks the heat right out of the air. So my solution is going to have the shop just stay heated all winter long to about 50-55 degrees, and then turn it up to 60-65 when I work out there. During the cold snap in February, it took me 3 days to bring the shop up to temp with my radiant kerosene heater. My big forced air propane and kerosene heaters just don't have the ability to maintain a temperature very well. They fill the shop with heat, but are super loud and super powerful, to the point I have to turn them back off and then the heat gets sucked right back out of the air. what a pain,

Anyway, since it's still a little too cold to work out there, I've added some Drafting Basics videos to my YouTube channel. These first two videos are all about how to read Zenith Blueprints. More videos on basic drafting skills and how to draw parts will follow.


Drafting Basics - Episode 2: Reading Zenith Blueprints - Part 1:


Drafting Basics - Episode 2: Reading Zenith Blueprints - Part 2:


More updates and build videos to come. Once I can start working in the shop again, I'll be priming and closing up the rudder. I'll then move on to the slats and flaperons.

Cheers!

Saturday, December 8, 2018

Shop Updates

Friends, 

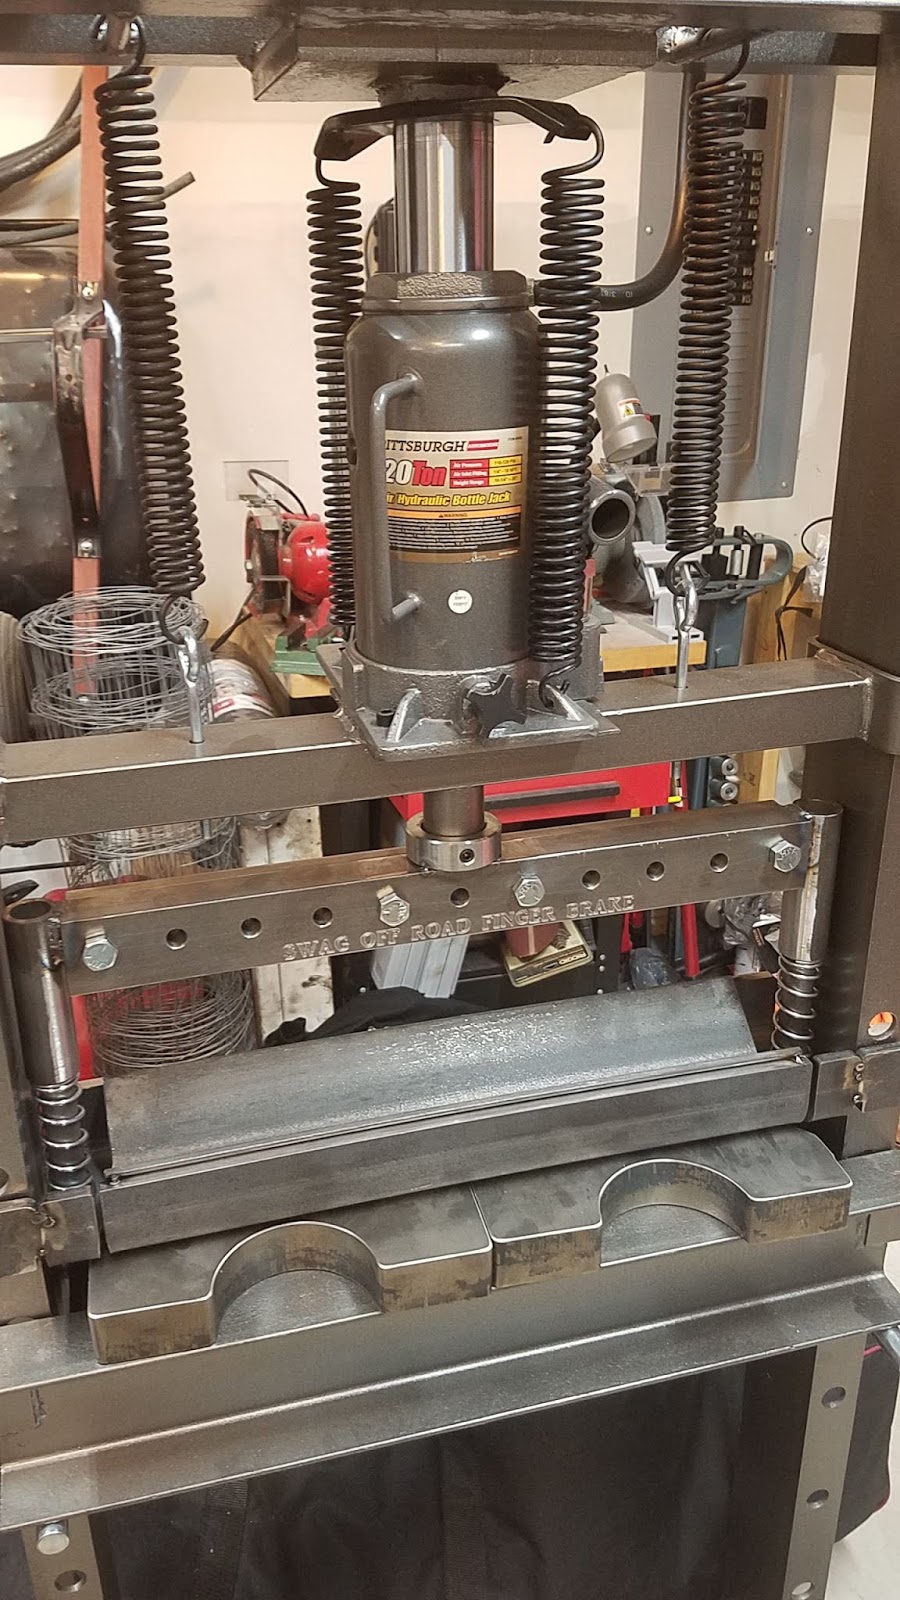
I'll have some new videos coming out soon, but I can't seem to gain any traction on video editing when I have other actual things to do on the Zenith, the Cessna and my home. Case in point, the shop is continually evolving in terms of fabrication capability. For a while now, I've wanted a press brake kit from Swag Off Road. They make a fantastic finger brake kit that works with the 12- and 20-ton Harbor Freight hydraulic H-frame presses. Shortly after I bought my 20-ton version in mid-2017, I ordered the Swag Off Road machined bottle jack knob, which eliminated the need to use the jack handle to release the valve. It's a great upgrade and rather cheap. I then added an air-over-hydraulic jack, because manually pumping that press is awful.

Later in 2017, I took advantage of Swag Off Road's one and only sale, Cyber Monday, to order their upgraded arbor plates. Harbor Freight ships both the 12-ton and 20-ton presses with the same weak arbor plates. The 20-ton press can grenade the plates under full load, and some people have gotten hurt. The Swag Off Road arbor plates are a welcome addition to the press.

For this year's (2018) Cyber Monday sale, I finally snagged the Swag Off Road 20-ton heavy duty finger press brake kit and got it tacked up:


I'm only running a 110 circuit for my TIG welder, so even at full amperage I'm struggling to get this thicker stuff stitched together. Fortunately, full penetration welds are not required, so I'm getting by. Here, you can see the press brake in position atop the upgraded arbor plates, with the machined knob on the bottle jack valve:


Lastly, I've been working for a few weeks trying to get the wobble out of my drill press chuck. When the drill is running, you can visibly watch the chuck wobble pretty badly. I was measuring up to .040" run-out, which is terrible. The drill eggs out my holes and just won't drill squarely. I break a lot of bits drilling steel now, and just can't get everything squared up. First, I tried a new chuck that fits the MT2 spindle. It's a lot heavier, but is nicely made and very solid. It did nothing to fix the wobble. 

Next, I added new bearings. Still no dice. I used the shop press for the bearings and to seat the chuck, so I know it's on squarely (assuming the spindle is within spec). I can only surmise that either the spindle is flexing during operation (certainly possible...it's pretty small in diameter) or it is bent slightly. I'll probably order a new spindle (a lot of the original parts for this press aren't available anymore, but SearsPartsDirect.com does have the spindles). I've had this press for years, and I've asked an awful lot of it. It's slated for replacement with a floor-standing model, but I haven't found one in stock locally, and I'm not dropping $125 on freight charges.


Anyway, I'll do another update once the press kit is fully welded and I have the new drill press. However, the next updates will have to do with the Zenith project and not just shop woes!

Cheers!

Sunday, November 25, 2018

Time Away = Mistakes!

Friends,

After what felt like forever, I was able to get back out to the shop over the past couple of weekends to work toward finishing up the elevator. One of the things that first stalled me out so many months ago was that I was trying to "build a better mousetrap" when it came to the access panels for the trim tab motor/servo. Zenith's typical access panels are just panels that are over-sized for the hole they cover and then riveted in place. I have seen some nice flush panels that use screws and rivnuts, had been interested in doing something similar.

After messing around with a rivet squeezer and some scrap a aluminum a couple times, I wasn't able to get my rivets to squeeze properly. I've watched several videos on this and I'm certain there's something simple that I've overlooked. But, I couldn't make them work some months ago and set that (and the whole project) aside due to other distractions. I finally just decided to go with what the blueprints specify (the simplest of solutions, to be sure), because I can always retrofit later. 

Enter Fall 2018: It's been 9 months since I last touched the project, and over a year since I had any kind of progress tempo going. I was dreading cutting the access panels and actuator cut-outs on what was otherwise a near-perfect elevator. Well, with my time away and perhaps a little too cavalier an attitude, I made a few mistakes when I started cutting.

I have no idea how I ended up doing it, but I cut the access panel on the top surface of the elevator instead of the bottom, right where the trim servo is supposed to mount:


What a beautiful access hole & cover panel! But, it's pretty clear in the blueprints:


My only solution was to rivet the original cover plate I made (the very first part I made for the airplane!) over the hole and then rivet the trim servo to that & the skin:


This turned out okay and has plenty of strength, but I got very lucky with the placement and spacing of rivet lines. I also had to drill an extra hole in the left (hidden from view above) mounting flange of the trim servo to accommodate an extra rivet where there's an existing hole in the skin. Again, very lucky that this all lined up properly under the circumstances.

Here, you can see the access panel cut-out in the proper location on the BOTTOM skin, actuator rod sticking out the back and ready to trim to length and mate to the elevator. A keen eye will notice the rivet hole that's too close to the actuator rod port. This was because I laid out & drilled my rivets before laying out the actuator port. Another rivet approximately 12 mm from the edge rivet will keep things structurally sound. If it develops a crack at the edge, I can simply widen the cut-out enough to remove the crack & rivet hole.


As if all that wasn't enough, I accidentally drilled & mounted the trim tab bracket to the trim tab backwards:


These 4 extra holes are from where I'd had it mounted on the wrong side. I originally thought I formed the bracket as a mirror image to what is shown in the plans, and therefore thought I would need to mount it on the outboard side of the trim tab arm. However, because I failed to do a simple test fitment of these parts before drilling, I failed to see that I had formed the trim tab bracket properly, thus requiring it to be mounted on the inboard side of the trim tab arm. This isn't a complete disaster, since four A4 rivets in those holes will seal them up and only 2 of the rivet heads will be in the slipstream. But still...dumb mistake!

Finally, although this isn't a mistake so much as a modification, I added some of Zenith's "Standard  L" to my nose and tip ribs to stiffen them up. When Zenith forms these, they have a little more flange material around the radius of the nose, allowing for a 3rd rivet to be installed on the skin toward the nose of the elevator. I had to trim away material bit by bit to get the radius to form on these ribs without cracking the material. As such, I felt they were a little too flimsy, and added some stiffening angle to them:


Ordinarily, you would install a 3rd rivet on the top and bottom radiuses, just head of the 2nd crimp around the nose. But I don't have enough flange material. These nose ribs really only provide a little shape structure for the curvature of the nose skins, so they don't need to be super strong, but the stiffening angles will certainly ensure they don't flex or crease under any kind of pressure.

As to why I made the errors in the access panel and brackets, I can only speculate that it's largely because I've been away from the project and remembered things incorrectly. Once you break the cycle of productivity, it's really hard to get it back. Moving forward, I'll keep reminding myself to check and re-check the locations of things and do test fits BEFORE I drill holes. At least I have the elevator completed, and just need to disassemble, prime and re-assemble with rivets. I filmed a lot of these issues  and will present them in my elevator build videos. More to come!

Cheers,

Greg

Sunday, September 9, 2018

Training & Flying

Friends,

As I mentioned in my previous post, one of the reasons I bought the Cessna was so that I could get back in the air while I build the Zenith. I had not been at the controls of an airplane in 5 years prior to buying the Cessna, and had logged very few hours in the previous 5. Most airplane builders usually have something to fly while they're building. After all, most builders are pilots and flying is largely the goal.

I got about 5 hours of dual instruction with a great instructor, and that included my Biennial Flight Review. I was amazed at how much I'd lost in skill in the last 10 years. I had to learn how to land a plane almost all over again! But, since getting my wings back, I've managed to fly another 12.5 hours. The plane has been in the shop for the past 3 weeks getting the nose strut rebuilt (a known issue when I bought it). But right before that, I flew my first Young Eagles!

My local EAA Chapter hosts three Young Eagles flight events during the summer. My first time out, I flew 31 kids and logged 4.8 hours of flight time, with 11 separate flights. It was a long, hot day, but totally worth it.  If you're unfamiliar with the EAA Young Eagles program, check it out here. I highly recommend getting kids to one of these free events to spark their interest in aviation! Free flights for kids ages 8-17, with a host of other benefits.

That's all for now. I'll be heading out to the shop to get back to work on the Zenith.

Cheers!

Monday, August 6, 2018

Where have I been?

Friends,

Wow, a whopping 8 months since my last blog update...so what's been going on?

Since November 2017, I have worked a lot on the project, but that all largely went on hold once winter set in. The 2017-2018 winter season was so cold I could not heat my shop/garage the same way I had in previous years. I tried several alternatives, but nothing worked. I switched gears and finished up a basement project unrelated to the Zenith build.

I also had emergency surgery, had to deal with a rental property that was destroyed by my tenants, among many other things. From April-July, I did nothing but work on the rental property. I was able to sell it, though, so that's a relief.

In addition, I bought an airplane. That's right, I bought a plane! I purchased a 1962 Cessna 172D with a Stene STOL kit. Prior to buying the Cessna, I had only logged about 11 flight hours in the last 10 years! Since the ultimate goal with the Zenith is to fly the darn thing, I figured I better get back in the sky and knock the dust off my piloting skills. I looked for months for a suitable factory airplane to serve me while I finish the Zenith. I figured that the 172D with STOL kit is pretty good certified approximation to the Zenith, even though it's a lot bigger and heavier.  However, it gives me pretty good STOL performance in a tricycle, high wing package. I'll be doing some pretty solid training and practice with it, in hopes that I'll be ready to transition to the Zenith when the time comes. I got the plane for a really good price and it was local to my home airport.


The nose art was on the plane when I bought it. The former owner is an Air Force veteran, who had the nose art added in tribute to "The Ruptured Duck," of The Doolittle Raid. Not sure if I'll keep the art or not. But for now, she's a great VFR bird for training, practice and loads of fun!

Back to the Zenith:

I haven't given up. My shop has been full of other projects and such since about February, so the Zenith has just been in moth balls since then. Now that all side projects are largely done, I'll be getting back into the Zenith soon. I'm finishing up a DIY airplane tug for the Cessna right now. My last progress on the Zenith was in February 2018, when I worked on the elevator. I shot a ton of footage of the elevator build, but then the memory card malfunctioned and I lost over half of it. There is no way to get the footage back unless I re-shoot it while building a new elevator. You can guess that's not going to happen, So my next project update video will only have a little elevator footage.

More to come!

Wednesday, November 22, 2017

Update & Bending Brake Video:

Friends, it's been a long time since my last update. I've put some work into the elevator assembly, but I had a lot of time away from the project over the summer. Life gets in the way of building sometimes! Now that we're heading into cold weather here in Michigan, I'll be spending a lot more time in the shop. I also decided to step up my game in video quality and production efficiency. I purchased new camera and microphone equipment to help speed up the filming process and allow me to get the kinds of video shots I really want. I also learned a new video editing software suite and re-formatted how I edit and publish videos. Hopefully, this investment in equipment and knowledge will translate to better quality videos for you, as well as making them much easier and less time consuming for me to produce. The first video I've produced in the new format is about bending brake choices and options for the Zenith STOL CH750 builder. Check it out below:


Now, with the new video equipment and my summer project out of the way, it's time to get cracking on the plane itself!

Cheers!

Sunday, May 21, 2017

Exciting Announcement: I got invited to be on a podcast!

Friends,

I've spent considerable time working on my YouTube production quality (still a long way to go). I want to make the content more watchable and exciting, but all in the hopes that the information I present is clear and easily digestible for fellow builders and enthusiasts. I've also been working on my keywords, titles and descriptions to make the information more easily located for other builders. In the last several months, that seems to have paid off! My subscriber list is growing every day, and there is a lot more feedback/discussion in the comments section.

One of the results of the increased exposure is that I was asked to be on the Evadot.com podcast, hosted by Michael Doornbos! Mr. Doornbos is a fellow Zenith builder working on his own 750 Cruzer kit project. In the podcast we talk about our own projects, but also general aspects of experimental aviation and building airplanes in your garage. You can check out the episode here:

Evadot Podcast - Ep. 104: Building Flying Machines In Your Garage

Also be sure to check out Mr. Doornbos' YouTube channel, where he chronicles, among other things, his 750 Cruzer kit build!


I have a lot more pictures and video content coming, so stay tuned!

Cheers!


Sunday, May 7, 2017

More delays, but finally back to work.

Friends,

Work and personal obligations have just been non-stop lately. Being able to work on the project has been an impossibility most days. In the last month, I've managed a little shop cleanup and organization, and managed to get all my parts in .063" rough cut. It took about 6 hours total to lay out all these parts onto .063" stock. Later today, I hope to get them filed/sanded down to finish size, and maybe even formed (most of them are flat pieces anyway). The upper fuselage channel is going to be the biggest challenge. It's nearly 4' long and has 3 bends along the length! Here are a few pictures of the layout of parts and the rough cut pieces:

Hard to see with the glare, but the upper fuselage doublers and other parts are nested in this layout:

Although I have electric shears that work well, the jigsaw was better suited to cut out all these parts nested so closely together:

Lots of little parts laid out in close proximity to minimize waste material. If you don't have to remake too many parts, a 1/2-sheet (4' x 6') of material is plenty to do the whole plane.

Larger parts rough cut, to be finished on band saw and belt sander. A few of the smaller parts still need to be separated from each other:

Cheers!

Sunday, March 26, 2017

Why I chose the Corvair engine conversion for my Zenith STOL CH 750

Friends,

As a follow-up to "Why I chose the Zenith STOL CH 750," I thought I'd go into some detail about why I chose a Chevrolet Corvair engine conversion for my project. The first part of the video mostly about why I chose the Corvair specifically. The second part of the video is somewhat about the Corvair, but also details a lot about automotive engine conversion considerations. So, if you are interested in my reasoning for the Corvair engine choice, or if you would like more information on what is involved with choosing an automotive engine conversion, check out my videos below:

Why I chose a Corvair engine conversion - Part 1:


Why I chose a Corvair engine conversion - Part 2:

Why I chose the STOL CH 750

Friends,

Almost every aircraft builder is asked at some point why he or she chose a specific design to build. It's certainly a fair question, and one I'm always happy to answer. However, if you're building a Zenith STOL CH 750 nowadays, you'll invariably be asked why you are not building a Zenith 750 Cruzer instead. Further, after maybe giving some additional answers, some folks will even tell you that you should be building a Cruzer instead. I've often found that interesting at best, and annoying at worst. Who decides what airplane is best for me? I do!

If you would like to know more about why I specifically chose the STOL CH 750, and why I would still choose that design if I had to choose today, check out the video:


So many delays, I made a video about dealing with them!

Friends,

As noted in my last blog post, I have experienced more than my fair share of delays and setbacks in the last 12 months. I figure that other builders may experience similar delays over the years it takes for us to finish our projects. Thus, I created a video about how to persevere in the face of such delays, and how I maintain at least some progress when it feels like you're not getting anything done on the project!


Monday, March 20, 2017

Delays, delays and more delays!

Friends,

No exciting content in this update. I just wanted to throw out a quick post about my lack of activity lately. I recently had the flu and one of our household pets was very ill for a few weeks (and ultimately is no longer with us). Shortly after that, my wife had emergency surgery, so I was taking care of her for about a week. In the last month, I only managed a few hours of work on the elevator. In addition, I'm getting our newly acquired travel trailer ready for this year's camping season.

I managed to acquire some new welding accessories and tooling to help with the 4130 frame and fuel tanks. Mainly, I upgraded to a "standard" style foot pedal with some additional tooling. The stock pedal on my AHP AlphaTig 200X left much to be desired. I also added a couple more TIG finger protectors, a clear Furick cup for the torch (this will give more visibility when welding the 4130 in tight places) and a Lagesse Square.


At any rate, I have the elevator skins completely match-drilled to the skeleton, and I'm working on the elevator trim tab attachment (pictures to come soon). 

The last 12 months have been the year of setbacks for sure! I only managed about 250 hours of construction from April 2016 to March 2017....about half of where I should be. All kinds of things just ate up my personal time in the last 12 months, from home improvement/repairs, to injuries, to illnesses, to an unexpectedly very busy holiday season...you name it! I'm hoping things settle down a bit in the coming months, though I may be building a garden shed to free up some room in the garage, and I still having a camper wiring project to complete. At the very least, I hope I don't have to deal with as many illnesses and injuries. 250 hours is a pittance!

Cheers!

Saturday, February 18, 2017

Working on the Elevator

Friends,

The last couple weeks have seen some progress. I was able to get the elevator skins bent properly (working on a video about those), and started drilling the skins. I like to pre-drill the skins so that I have pilot holes that allow me to see the center line of the ribs/spars underneath. This is similar to how Zenith used to ship their kits before they started CNC match-drilling everything. There are ways to drill the skins and ribs blind, but I prefer being able to visually ensure the ribs are in alignment. Plus, with the pilot holes drilled, I generally don't have to worry about the bits wandering.

However, if you use this method, you absolutely must ensure that you've measured your rib stations onto the skins properly. Somehow, I'd managed to locate a rivet line about 3/8" offset from one of the rivet stations. I think I accidentally had the tape measure hooked on something off the edge of the skin, but I don't know for sure. Maybe I just measured wrong. It was a duplicate measurement to the bottom side of the skin, and the exact same mirrored measurements for the co-pilot's side rear skin. It was just the top rivet line of the one side that I'd messed up. I'm going to re-make the skin and use it as a template to pilot hole the new one (without using the bad rivet line, of course). So it'll add an hour or so to the elevator (and scrap the original skin), but I'd rather take care of it now than just fill the holes with rivets.

Elevator Right and Left side Trailing Edge Skins:

Homemade gauge for checking the bend angle:

Elevator Nose Skins roll-formed manually with a 2x4:

Test layout of skins:

Center overlap of rear skins for strength:

Rear skins cleco'd to the spar and ribs:


Another thing to which you have to pay close attention is the rivet pitch and size specified in the plans. The overlapping skins in the center get drilled for A5 rivets at a pitch of 25. I missed that part on the plans, and accidentally drilled them to 40 pitch, which is what the rest of the elevator takes. I compensated by doubling the pitch to 20, with only results in an extra rivet on the front and rear rows, but it also means I have to remake the upper and lower control horns for the elevator to be able to use the existing rivet holes to mount the horns. With the 40 pitch, the rivets fall in slightly the wrong position, causing there not to be enough flange material on the horns. I'll remake the horns with longer flanges to solve that problem.

Thursday, February 9, 2017

3D Printing For Prototypes

Friends,

I've been curious about 3D printing technology for several years. While at AirVenture 2016, I was able to visit the 3D printing display in the drone exhibit. I'd been involved in a few discussions about the viability of 3D printing for aviation. Regarding my STOL CH 750 project, I've identified some key things I'd like to design, and 3D printing is convenient when paired with EAA's Solidworks CAD member benefit. I'm considering using a DIY EFIS/PFD system based on the Raspberry Pi computer and commercially available ruggedized displays. As such, I could end up with a need for custom bezels, mounting brackets, etc. At the very least, I could print custom mounting hardware for GoPro cameras to use while filming flight footage for my subscribers!

I have some other ideas for parts for the airplane, and a distant goal may include manufacturing parts for sale. But let's not put the cart before the horse. Right now, I just want to experiment with the technology as an intellectual exercise. After that, I probably will apply non-structural designs to the airplane. Following that, if the process seems viable, I may turn it into a business venture. Anyway, it's a sort-of project-related idea that I'm excited to share. I even shot a short video about it:


My printer kit:
http://www.gearbest.com/3d-printers-3d-printer-kits/pp_343643.html?wid=21

Prusa i3 Printer, upon which mine is based:
http://www.prusa3d.com/#our-printer

EAA Solidworks Member Benefit:
https://www.google.com/search?q=eaa+solidworks&ie=utf-8&oe=utf-8

Thingiverse 3D Printer File Database and Resource Website:
http://www.thingiverse.com/

Cheers,

Greg

Monday, February 6, 2017

Slat Skin Forming Videos are up!

Friends, I've edited and uploaded the Slat Skin Forming Videos to YouTube. Check 'em out:

Forming the Slat Skins - Part 1/2:

Forming the Slat Skins - Part 2/2:

Stay tuned for an update on forming the elevator skins!

Cheers,

Greg

Sunday, February 5, 2017

Got skins?

Friends,

After finally getting my assembly table rebuilt and getting back to work, I spent the last several days cutting skin blanks for the elevator, slats and flaperons. I decided to go ahead and bend up the slat skins first, as they are the most complicated skins to bend. The nice thing is that they can all be done on the brake, but there is a lot of setup time in between certain bends. And with 4 bend lines on each skin, there is a lot of time laying out the part for bending. 

As always, with the complicated bends and large pieces, I made a test strip about 20mm wide to determine my bend pattern. I got very lucky on the first try (although now I'm so familiar with how the brake bends, that it was a sort of "educated guess" about where to put the bend lines). Here are the results:

Test skin pattern next to slat rib and slat tip. Not the opposing flange bend at the lower right:

Test skin pattern clamped around rib to check measurements:

The first inboard slat skin bent to tolerance (it's perfect!). I bent this skin up from start to finish without bending anything on the other three skins, so to ensure the part would turnout correctly. It is approximately 6 feet long:

 Another view of the first slat skin. These skins are made in .016" and they are extremely flimsy. Care must be taken to avoid kinks and smileys:

All four slat skins bent to tolerance...2 inboard and 2 outboard skins (the outboard skins are nearly 7 feet long). Once the first skin was completed, I switched to "assembly line" mode, and performed the same bend on each skin before setting up the brake to perform the next bend. This saved a lot of setup time compared to how I bent the first skin:

Another view of the slat skins:

I shot a full video on how I bent these skins and it details the bending brake setup issues. The video also includes some of my reasoning on the "how and why" I did things the way I did. I'll get that video cut together soon and post an update with it. I also still have hours of other videos to cut together, particularly the remaining parts of the Horizontal Stabilizer Build. That's all for now!

Cheers,

Greg

Tuesday, January 31, 2017

Assembly Table Video

Friends,

I've posted a video detailing how I built my new assembly table on YouTube...check it out below:


Cheers,

Greg

Monday, January 30, 2017

Finally back at it!

Welcome back fellow aircraft builders and aviation enthusiasts! I've been away for far too long, both from the project itself, and getting my updates published. I was very busy during the holiday season, as I'm sure many of you were. Family visits, random projects, travel...we all have things in life that can take us away from the project. Indeed, the last time I worked on the plane at all was over Thanksgiving weekend! But here we are, the end of January, and I've managed to get back at it.

One of the things that was taking so long was the condition of my assembly table. This whole build process has been an evolution of sorts. My original table design had folding leaves and was not originally going to have to support a 300 lb. bending brake. As the project evolved, including the brake, the original table just wasn't going to cut it. Further, after finishing up the horizontal stabilizer (more video segments to come), I discovered the table had some twist to it that could not be resolved, and transferred some of that to the stabilizer. I was able to minimize the twist in the stabilizer to around 1-degree (more than I would like but still acceptable). Thus, I needed to build a whole new table to avoid putting twist into the other substructures. It was a setback for sure, but a far better decision to start with a clean slate on the table. I cannibalized the old one for some of the lumber, but built a much heavier and more solid table than before. The new table has four 2x6 "longerons" bolstered in the center and at the ends with 2x4s. All of the structural bits are fastened with 1/4" x 2.5" lag screws and washers. Since there are no folding leaves now, there are no longer multiple surfaces to try to level or minimize twist. So, after several weekends of re-organizing the shop, cleaning up, rebuilding things, and finally assembling a new table, I was able to start cutting the skins for the flaperons, slats and the elevator last night. Finally, some actual progress on the plane!

New assembly table (Completed 1/28/2017):

Cutting slat skins out of .016":

Using cantilevered 2x4s to clamp the modular straightedge in place for Olfa cutting:

Another view of the cantilevered 2x4 clamps:

All 4 slat skins rolled for storage until I bend them to shape:
I will finish cutting the skins for the flaperons and elevator before I start bending and assembling any of them. I already have the skeletons done for those structures, so rolling the skins helps keep them out of the way and free from damage until I form them for assembly. I had originally planned on starting the wings this winter, but I have all these assembled skeletons laying around (the slats don't really have an independent skeleton...you start assembly by attaching bits to the skins). By getting these smaller structures done, I'll be able to focus on the wings and fuselage starting in spring/early summer. Lots of visual progress to come!

Cheers,

Greg